15 Easy Christmas Nail Ideas for 2025
You're about to discover some of the most delightful and straightforward Christmas nail ideas for 2025. Imagine your nails adorned with classic red and gold designs that never go out of style, or playful candy cane stripes that capture the essence of the holiday spirit. But that's just the beginning—how about intricate snowflakes on a frosty blue base or charming gingerbread man art? There's a whole array of festive options waiting to add a touch of holiday cheer to your fingertips. Want to know how to bring these ideas to life? Let's explore further.
Classic Red and Gold
The allure of classic red and gold Christmas nails lies in their timeless elegance and festive charm. You can't go wrong with this combination, as it perfectly captures the essence of the holiday season.
Imagine your nails painted a rich, vibrant red, symbolizing warmth and joy, adorned with shimmering gold accents that sparkle like tinsel on a Christmas tree. The contrast between the bold red and the glistening gold creates a striking visual impact, making your nails stand out at any holiday gathering.
Whether you opt for gold glitter tips, intricate gold designs, or even a simple gold stripe, these colors complement each other beautifully. This timeless style isn't just chic, it's also incredibly versatile, fitting any holiday outfit.
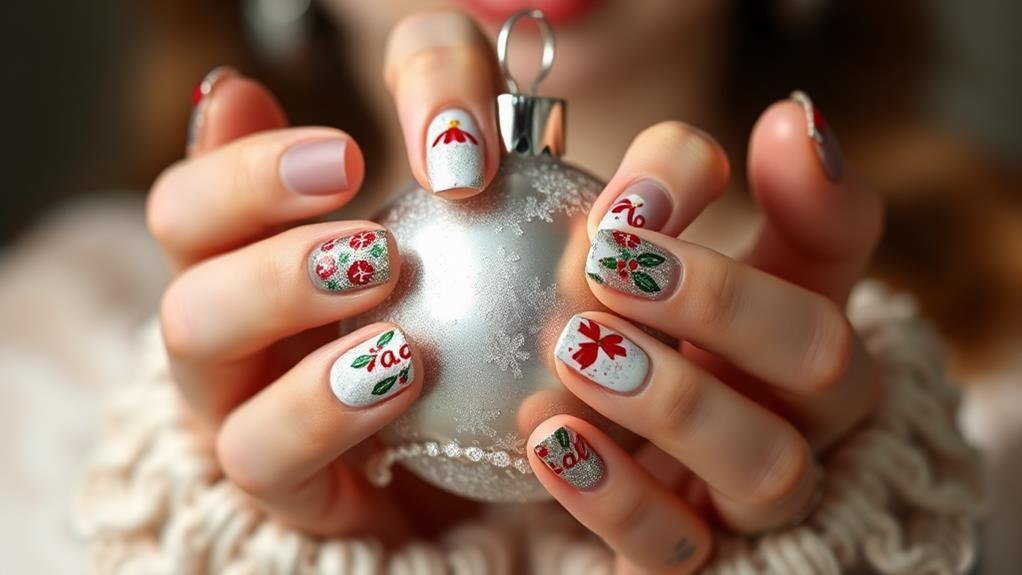
Green Holly Accents
While classic red and gold nails offer timeless elegance, green holly accents bring a touch of nature's beauty to your holiday manicure. Imagine tiny green leaves with bright red berries adorning your nails, creating a festive and vibrant look. You can pair these holly accents with a simple nude or white base for a chic finish.
Here's a quick breakdown of how you can incorporate green holly accents into your nail design:
| Step | Description | Tip |
|---|---|---|
| 1 | Apply a base coat | Protects your nails |
| 2 | Paint nails with a neutral base | Makes holly pop |
| 3 | Use green polish for leaves | Small brush works best |
| 4 | Add red dots for berries | Use a dotting tool |
| 5 | Finish with a top coat | Adds shine and protection |
Try this festive design and watch your nails steal the show this Christmas!
Candy Cane Stripes
Immerse yourself in the festive spirit with Candy Cane Stripes on your nails, capturing the essence of holiday cheer.
Start with a crisp white base coat to mimic the candy cane's classic look. Once dry, use a thin nail art brush or striping tape to create vibrant red stripes. Place the stripes diagonally for an authentic candy cane effect.
For added sparkle, consider using glitter red polish for a shimmering touch. Seal your design with a glossy top coat to guarantee your stripes stay vibrant throughout the season.
It's a fun and easy way to bring a bit of Christmas magic to your manicure, making your nails a delightful conversation starter at any holiday gathering.
Snowflake Sparkle
After enjoying the festive charm of Candy Cane Stripes, let's explore another enchanting design perfect for the season: Snowflake Sparkle.
This design captures the magic of a winter wonderland right on your nails. Start with a deep, midnight blue base that evokes a crisp, starry night. Using a fine-tipped white nail polish, delicately draw intricate snowflakes on each nail, varying the patterns to create a unique look.
Add a touch of silver glitter to the snowflakes for extra sparkle, mimicking the glistening of freshly fallen snow under moonlight. Finish with a clear top coat to seal in the design and add shine.
Snowflake Sparkle nails will certainly make your holiday season feel even more magical and festive.
Reindeer Silhouettes
For a playful yet elegant twist on holiday nail art, Reindeer Silhouettes make a perfect choice.
Imagine your nails showcasing delicate reindeer shapes prancing across a snowy backdrop. Start by applying a soft, wintry base color like pale blue or creamy white.
Next, use a fine nail brush or a stencil to paint the reindeer silhouettes in a contrasting shade—perhaps black or dark brown for a striking effect.
Don't forget to add tiny details, like antlers and hooves, to bring your reindeer to life.
Finish with a clear, glossy top coat to seal your design and add shine.
This charming look is sure to capture the festive spirit, making your nails a delightful holiday accessory.
Festive Plaid Patterns
Plaid patterns are a timeless and cozy choice for holiday nails, instantly evoking the warmth and charm of the season. Imagine vibrant reds, deep greens, and classic whites crisscrossing your nails, creating that perfect festive flair.
To get started, use a fine brush or nail striping tape to draw clean lines. Begin with a solid base color, like a rich red or a snowy white, then layer on the plaid design with contrasting shades. You can even add a touch of metallic gold or silver for an extra holiday sparkle.
These designs are perfect for any holiday gathering, effortlessly complementing your favorite winter outfits. Plaid nails aren't only stylish but also a fun way to showcase your festive spirit.
Glitter Gradient
While plaid patterns bring a cozy charm to holiday nails, glitter gradients add a touch of glamour and sparkle. Imagine your nails shimmering like freshly fallen snow, catching the light with every move.
Start with a base color—maybe a deep red or wintery blue. Then, dip a sponge into glitter polish and dab it onto the tips of your nails, gradually fading the glitter toward the cuticles. This creates a stunning gradient effect that looks both festive and elegant.
You can use silver, gold, or even multicolored glitter for an extra festive flair. Don't forget to seal your masterpiece with a clear top coat to keep that sparkle shining all season long.
Your nails will be the talk of every holiday party!
Metallic Snowflakes
To make your holiday nails truly stand out, try incorporating metallic snowflakes into your design.
Begin with a base coat in a deep color like navy or burgundy, which will make the metallic details pop. Use a thin brush or a nail art pen to draw delicate snowflake patterns on each nail.
Silver and gold metallic shades work wonderfully and reflect light, adding an extra sparkle to your festive look. For added dimension, you can layer different metallic colors or even add tiny rhinestones at the center of each snowflake.
Seal your masterpiece with a glossy top coat to guarantee it lasts throughout all your holiday festivities. Your nails will capture the magic of winter, dazzling everyone around you!
Christmas Tree Tips
As the holiday season approaches, it's the perfect time to adorn your nails with festive Christmas tree designs.
Start by painting your nails a deep green, evoking the lush pine of a Christmas tree. Add tiny dot ornaments using vibrant colors like red, gold, and blue for a dazzling effect. For extra sparkle, use a glitter topcoat to make your nails shimmer like twinkling lights.
To create a more intricate design, consider painting a miniature Christmas tree on an accent nail, using a thin brush to add details like garlands and stars.
Don't forget a glossy topcoat to seal your masterpiece and keep your festive nails looking fresh throughout the holiday celebrations.
Santa Hat Designs
Santa hat designs are a whimsical way to bring holiday cheer to your nails. Start by painting a red triangle at the tip of each nail, resembling Santa's iconic hat. Add a fluffy white brim at the base and a small white dot at the tip to complete the look. You can use glitter polish or rhinestones for extra sparkle. Here's a quick guide to help you:
| Step | Description | Tip |
|---|---|---|
| 1. Base Color | Paint nails with a light nude shade | Let it dry completely before the next step |
| 2. Red Hat | Draw a red triangle on each nail | Use a thin brush for precision |
| 3. White Brim | Add a white line at the base | Make it fluffy with small strokes |
| 4. Pom-Pom | Dot a white circle at the tip | Use a dotting tool for even circles |
| 5. Finish | Apply a clear top coat | Seal in designs to prevent chipping |
These steps will make your nails festive and fun, perfect for the holiday season!
Holiday Lights
Holiday lights nail designs bring the twinkling joy of Christmas right to your fingertips. Imagine tiny, colorful lights dancing across your nails, capturing the festive spirit instantly.
Start with a dark or neutral base color; black, navy, or even a deep green works wonderfully. Next, use a fine brush or nail art pen to draw delicate, looping lines mimicking light strings. Choose vibrant shades like red, yellow, green, and blue to dot along the lines, creating the light bulbs.
For added sparkle, opt for glitter polish or small rhinestones. Don't forget a clear top coat to seal your design and add shine.
This design is perfect for holiday gatherings, making your nails a conversation starter and spreading Christmas cheer.
Gingerbread Man Art
Bringing the charm of gingerbread men to your nails adds a whimsical touch to your holiday look. Imagine tiny, smiling gingerbread men gracing your fingertips, each one a symbol of festive cheer. You can use fine brushes to paint detailed little faces, buttons, and icing. Opt for a warm brown base, and add white, red, and green details for a true Christmas feel. If you're short on time, use gingerbread man nail stickers to get the same delightful effect without the fuss. Here's a quick guide to help you visualize:
| Element | Description |
|---|---|
| Base Color | Warm brown, resembling gingerbread |
| Icing Details | White lines for decorating |
| Buttons | Small red and green dots |
| Faces | Smiling expressions with tiny brushes |
| Tools Needed | Fine brushes, nail stickers, or decals |
Your nails will spread joy and bring smiles wherever you go!
Frosted French Tips
Frosted French tips offer a sophisticated yet festive twist on the traditional French manicure. Imagine your nails with a sleek, icy finish that shimmers like freshly fallen snow.
Start with a pale, nude base coat, then gently apply a frosty white polish to the tips. For an extra festive touch, consider adding a subtle glitter topcoat to catch the holiday lights.
It's a simple yet elegant look that's perfect for any Christmas celebration. You can customize the frosted effect by using a matte topcoat for a more subdued, wintry feel.
Whether you're attending a holiday party or just want to add some seasonal cheer to your everyday style, frosted French tips are a delightful choice.
Winter Wonderland
While frosted French tips offer a chic nod to the season, stepping into a Winter Wonderland theme can elevate your holiday nail game to new heights.
Imagine your nails adorned with delicate snowflakes, shimmering ice crystals, and soft, powdery hues of pale blue and white. You can start with a frosty base coat, then add intricate snowflake designs using a fine brush and white polish.
Don't forget a touch of glitter to mimic the sparkle of freshly fallen snow. For extra flair, incorporate tiny rhinestones or silver accents.
This magical look captures the essence of a snowy landscape, making your nails the perfect winter accessory. Embrace the enchantment and let your nails twinkle like a winter wonderland.
Nutcracker Nails
The magic of the holiday season comes alive with Nutcracker Nails, inspired by the timeless ballet. Imagine your nails adorned with charming Nutcracker soldiers, graceful ballerinas, and sparkling snowflakes.
You can start with a base coat of deep red or festive green, adding intricate details using white, gold, and black polish. Don't forget the glitter for that extra holiday sparkle!
To make it easier, use fine nail art brushes or nail stickers for precise designs. Each nail can tell a different part of the Nutcracker story, making your hands a festive masterpiece.
These nails are perfect for holiday parties, family gatherings, or just spreading Christmas cheer everywhere you go. Get creative and let your nails dance into the holiday spirit!